Camunda BPM is an open-source workflow and decision automation platform. Camunda BPM ships with tools for creating workflow and decision models, operating deployed models in production, and allowing users to execute workflow tasks assigned to them.
By default, Camunda comes with an embedded database called H2, which works pretty decently within a Java environment with relatively small memory footprint. However, when it comes to scaling and high availability, there are other database backends that might be more appropriate.
In this blog post, we are going to deploy Camunda BPM 7.10 Community Edition on Linux, with a focus on achieving database high availability. Camunda supports major databases through JDBC drivers, namely Oracle, DB2, MySQL, MariaDB and PostgreSQL. This blog only focuses on MySQL and MariaDB Galera Cluster, with different implementation on each - one with ProxySQL as database load balancer, and the other using the JDBC driver to connect to multiple database instances. Take note that this article does not cover on high availability for the Camunda application itself.
Prerequisite
Camunda BPM runs on Java. In our CentOS 7 box, we have to install JDK and the best option is to use the one from Oracle, and skip using the OpenJDK packages provided in the repository. On the application server where Camunda should run, download the latest Java SE Development Kit (JDK) from Oracle by sending the acceptance cookie:
$ wget --header "Cookie: oraclelicense=accept-securebackup-cookie" https://download.oracle.com/otn-pub/java/jdk/12+33/312335d836a34c7c8bba9d963e26dc23/jdk-12_linux-x64_bin.rpmInstall it on the host:
$ yum localinstall jdk-12_linux-x64_bin.rpmVerify with:
$ java --version
java 12 2019-03-19
Java(TM) SE Runtime Environment (build 12+33)
Java HotSpot(TM) 64-Bit Server VM (build 12+33, mixed mode, sharing)
Create a new directory and download Camunda Community for Apache Tomcat from the official download page:
$ mkdir ~/camunda
$ cd ~/camunda
$ wget --content-disposition 'https://camunda.org/release/camunda-bpm/tomcat/7.10/camunda-bpm-tomcat-7.10.0.tar.gz'
Extract it:
$ tar -xzf camunda-bpm-tomcat-7.10.0.tar.gzThere are a number of dependencies we have to configure before starting up Camunda web application. This depends on the chosen database platform like datastore configuration, database connector and CLASSPATH environment. The next sections explain the required steps for MySQL Galera (using Percona XtraDB Cluster) and MariaDB Galera Cluster.
Note that the configurations shown in this blog are based on Apache Tomcat environment. If you are using JBOSS or Wildfly, the datastore configuration will be a bit different. Refer to Camunda documentation for details.
MySQL Galera Cluster (with ProxySQL and Keepalived)
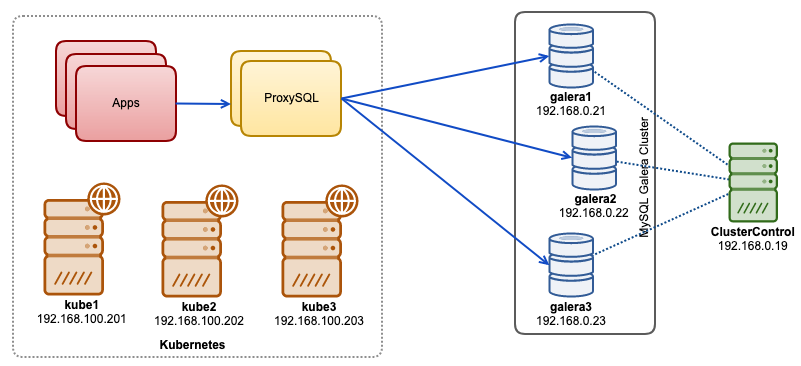
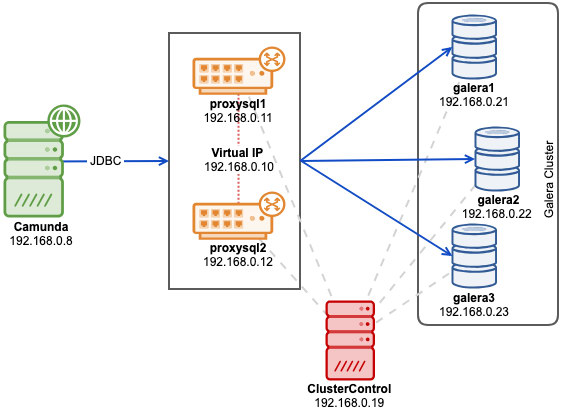
We will use ClusterControl to deploy MySQL-based Galera cluster with Percona XtraDB Cluster. There are some Galera-related limitations mentioned in the Camunda docs surrounding Galera multi-writer conflicts handling and InnoDB isolation level. In case you are affected by these, the safest way is to use the single-writer approach, which is achievable with ProxySQL hostgroup configuration. To provide no single-point of failure, we will deploy two ProxySQL instances and tie them with a virtual IP address by Keepalived.
The following diagram illustrates our final architecture:
First, deploy a three-node Percona XtraDB Cluster 5.7. Install ClusterControl, generate a SSH key and setup passwordless SSH from ClusterControl host to all nodes (including ProxySQL). On ClusterControl node, do:
$ whoami
root
$ ssh-keygen -t rsa
$ for i in 192.168.0.21 192.168.0.22 192.168.0.23 192.168.0.11 192.168.0.12; do ssh-copy-id $i; done
Before we deploy our cluster, we have to modify the MySQL configuration template file that ClusterControl will use when installing MySQL servers. The template file name is my57.cnf.galera and located under /usr/share/cmon/templates/ on the ClusterControl host. Make sure the following lines exist under [mysqld] section:
[mysqld]
...
transaction-isolation=READ-COMMITTED
wsrep_sync_wait=7
...
Save the file and we are good to go. The above are the requirements as stated in Camunda docs, especially on the supported transaction isolation for Galera. Variable wsrep_sync_wait is set to 7 to perform cluster-wide causality checks for READ (including SELECT, SHOW, and BEGIN or START TRANSACTION), UPDATE, DELETE, INSERT, and REPLACE statements, ensuring that the statement is executed on a fully synced node. Keep in mind that value other than 0 can result in increased latency.
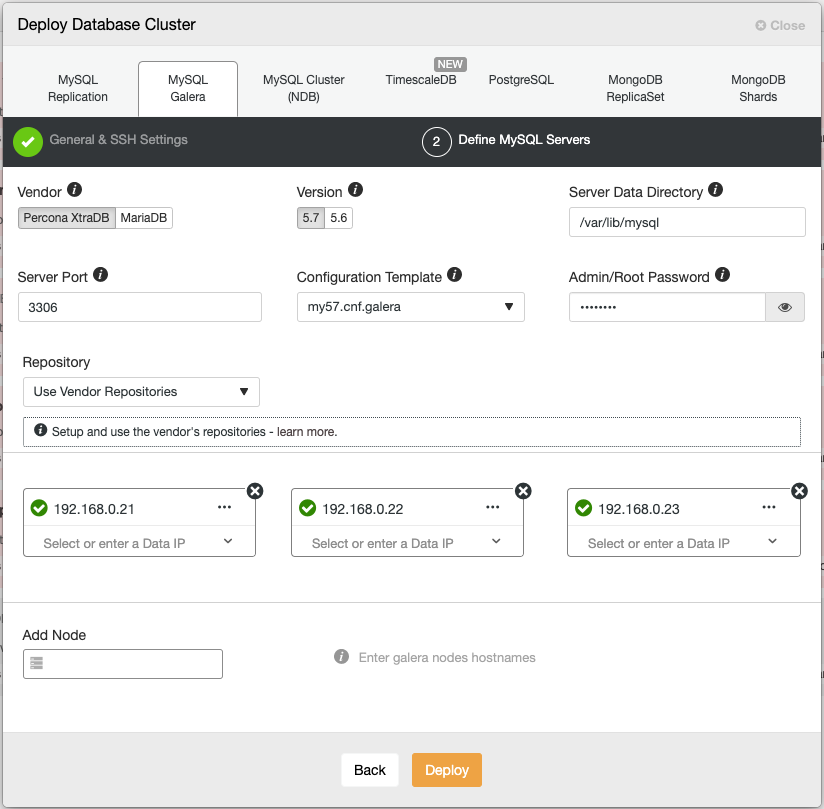
Go to ClusterControl -> Deploy -> MySQL Galera and specify the following details (if not mentioned, use the default value):
- SSH User: root
- SSH Key Path: /root/.ssh/id_rsa
- Cluster Name: Percona XtraDB Cluster 5.7
- Vendor: Percona
- Version: 5.7
- Admin/Root Password: {specify a password}
- Add Node: 192.168.0.21 (press Enter), 192.168.0.22 (press Enter), 192.168.0.23 (press Enter)
Make sure you got all the green ticks, indicating ClusterControl is able to connect to the node passwordlessly. Click "Deploy" to start the deployment.
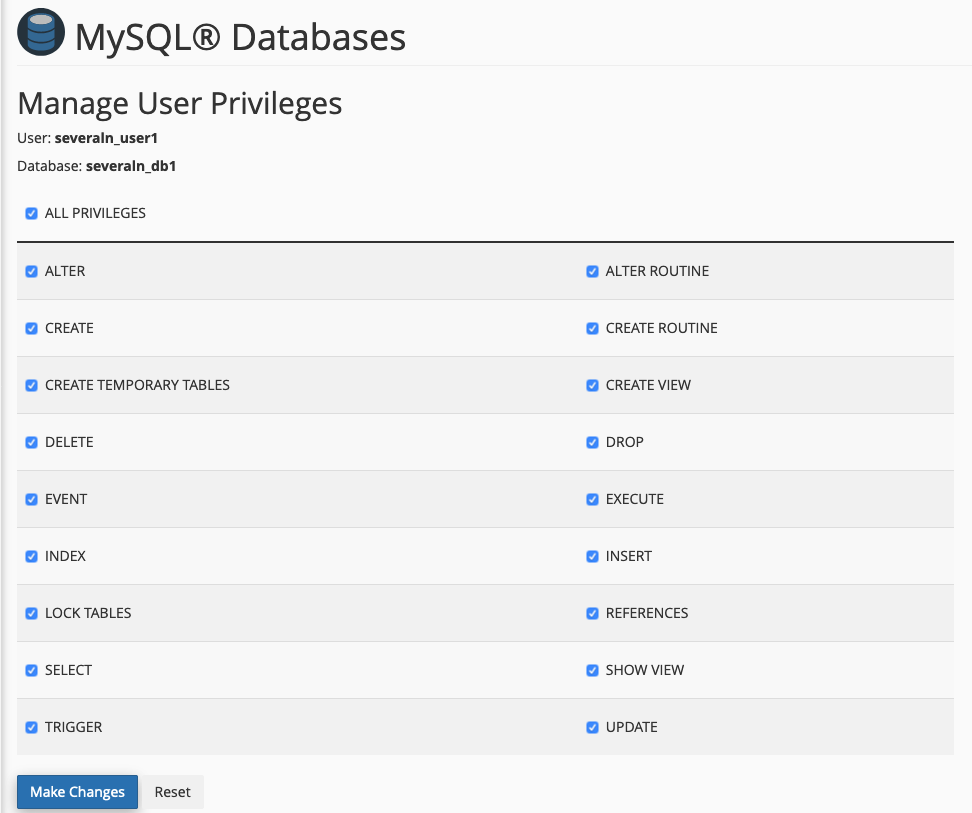
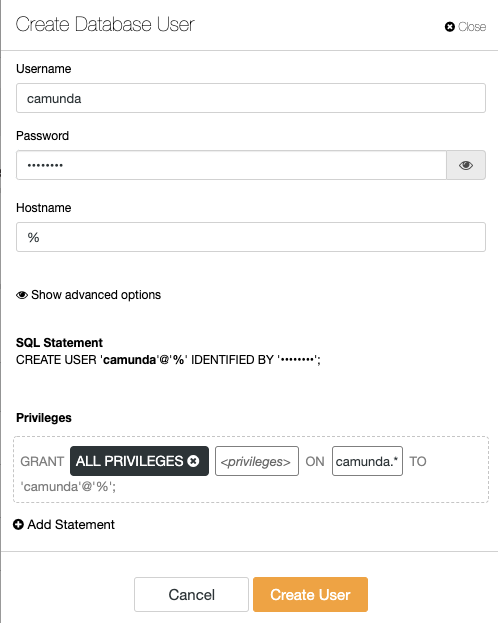
Create the database, MySQL user and password on one of the database nodes:
mysql> CREATE DATABASE camunda;
mysql> CREATE USER camunda@'%' IDENTIFIED BY 'passw0rd';
mysql> GRANT ALL PRIVILEGES ON camunda.* TO camunda@'%';
Or from the ClusterControl interface, you can use Manage -> Schema and Users instead:
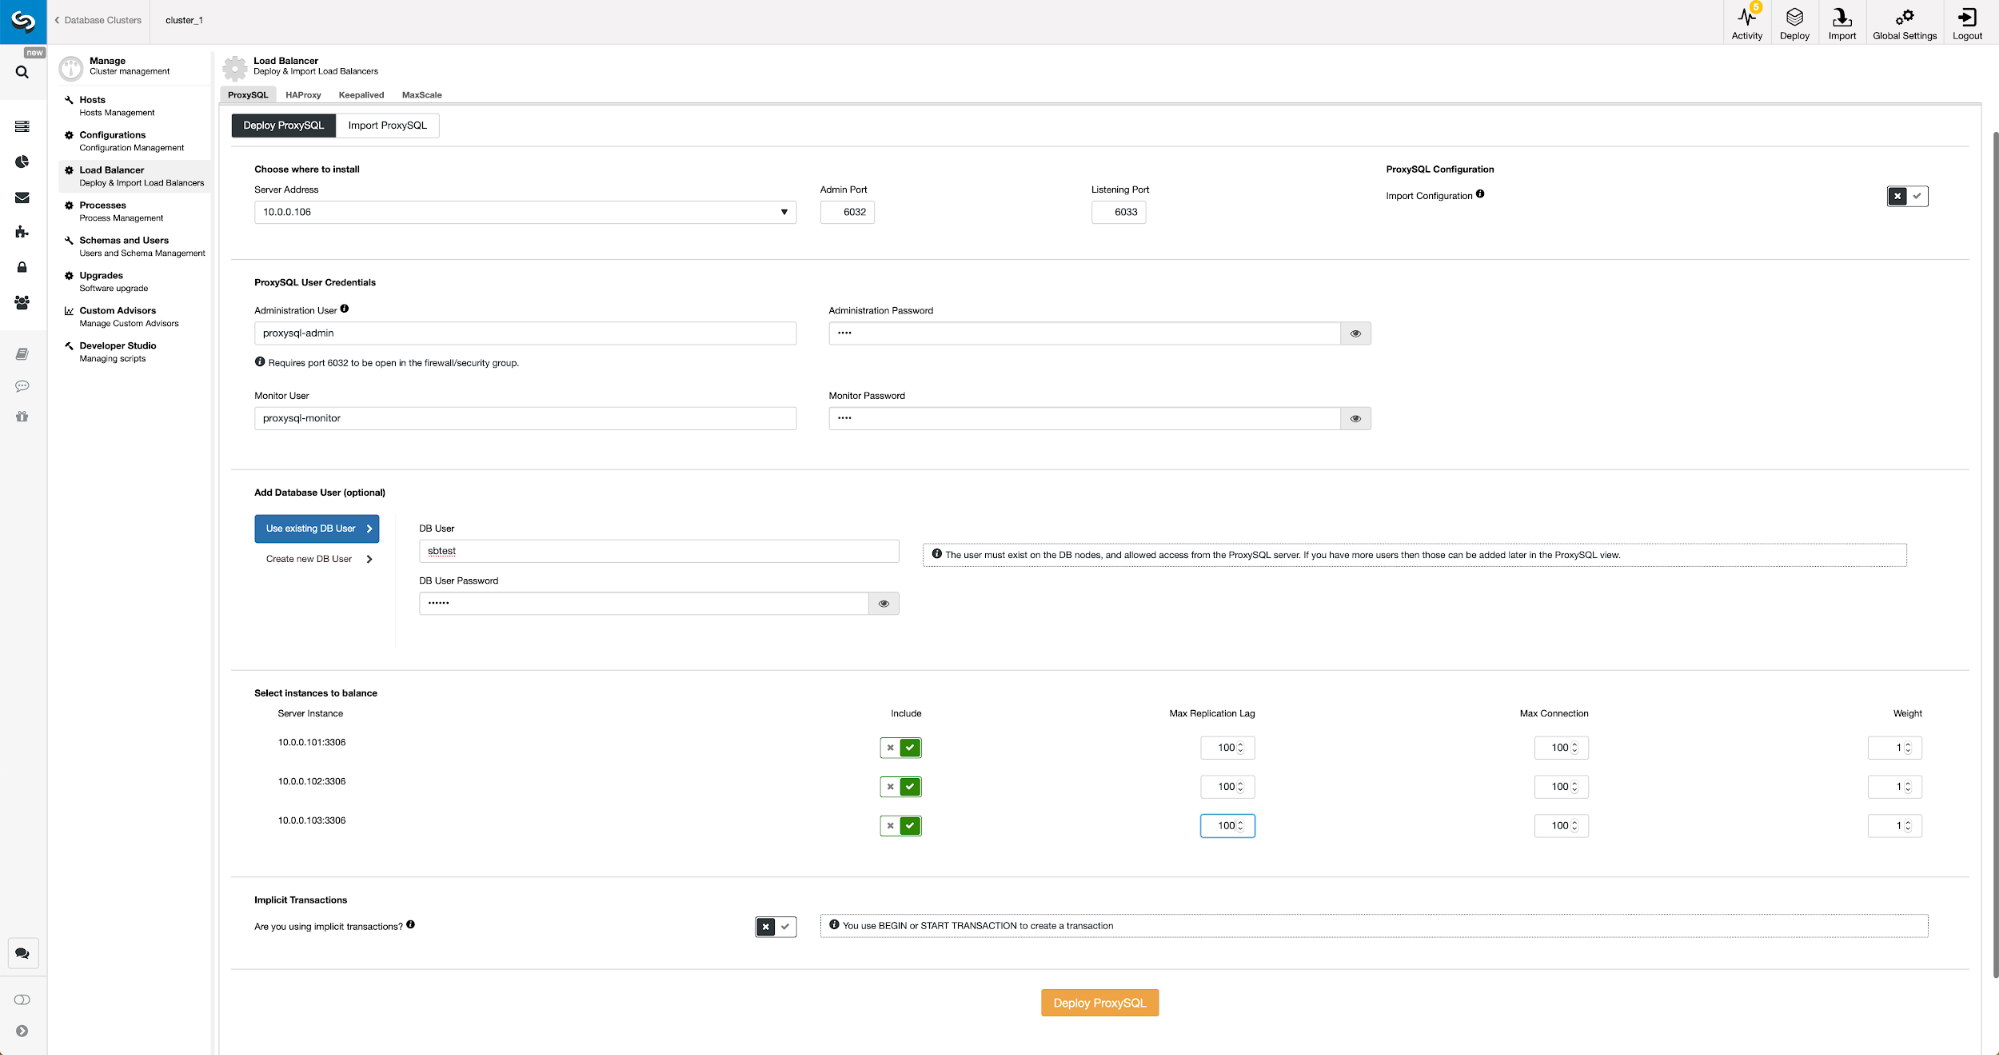
Once cluster is deployed, install ProxySQL by going to ClusterControl -> Manage -> Load Balancer -> ProxySQL -> Deploy ProxySQL and enter the following details:
- Server Address: 192.168.0.11
- Administration Password:
- Monitor Password:
- DB User: camunda
- DB Password: passw0rd
- Are you using implicit transactions?: Yes
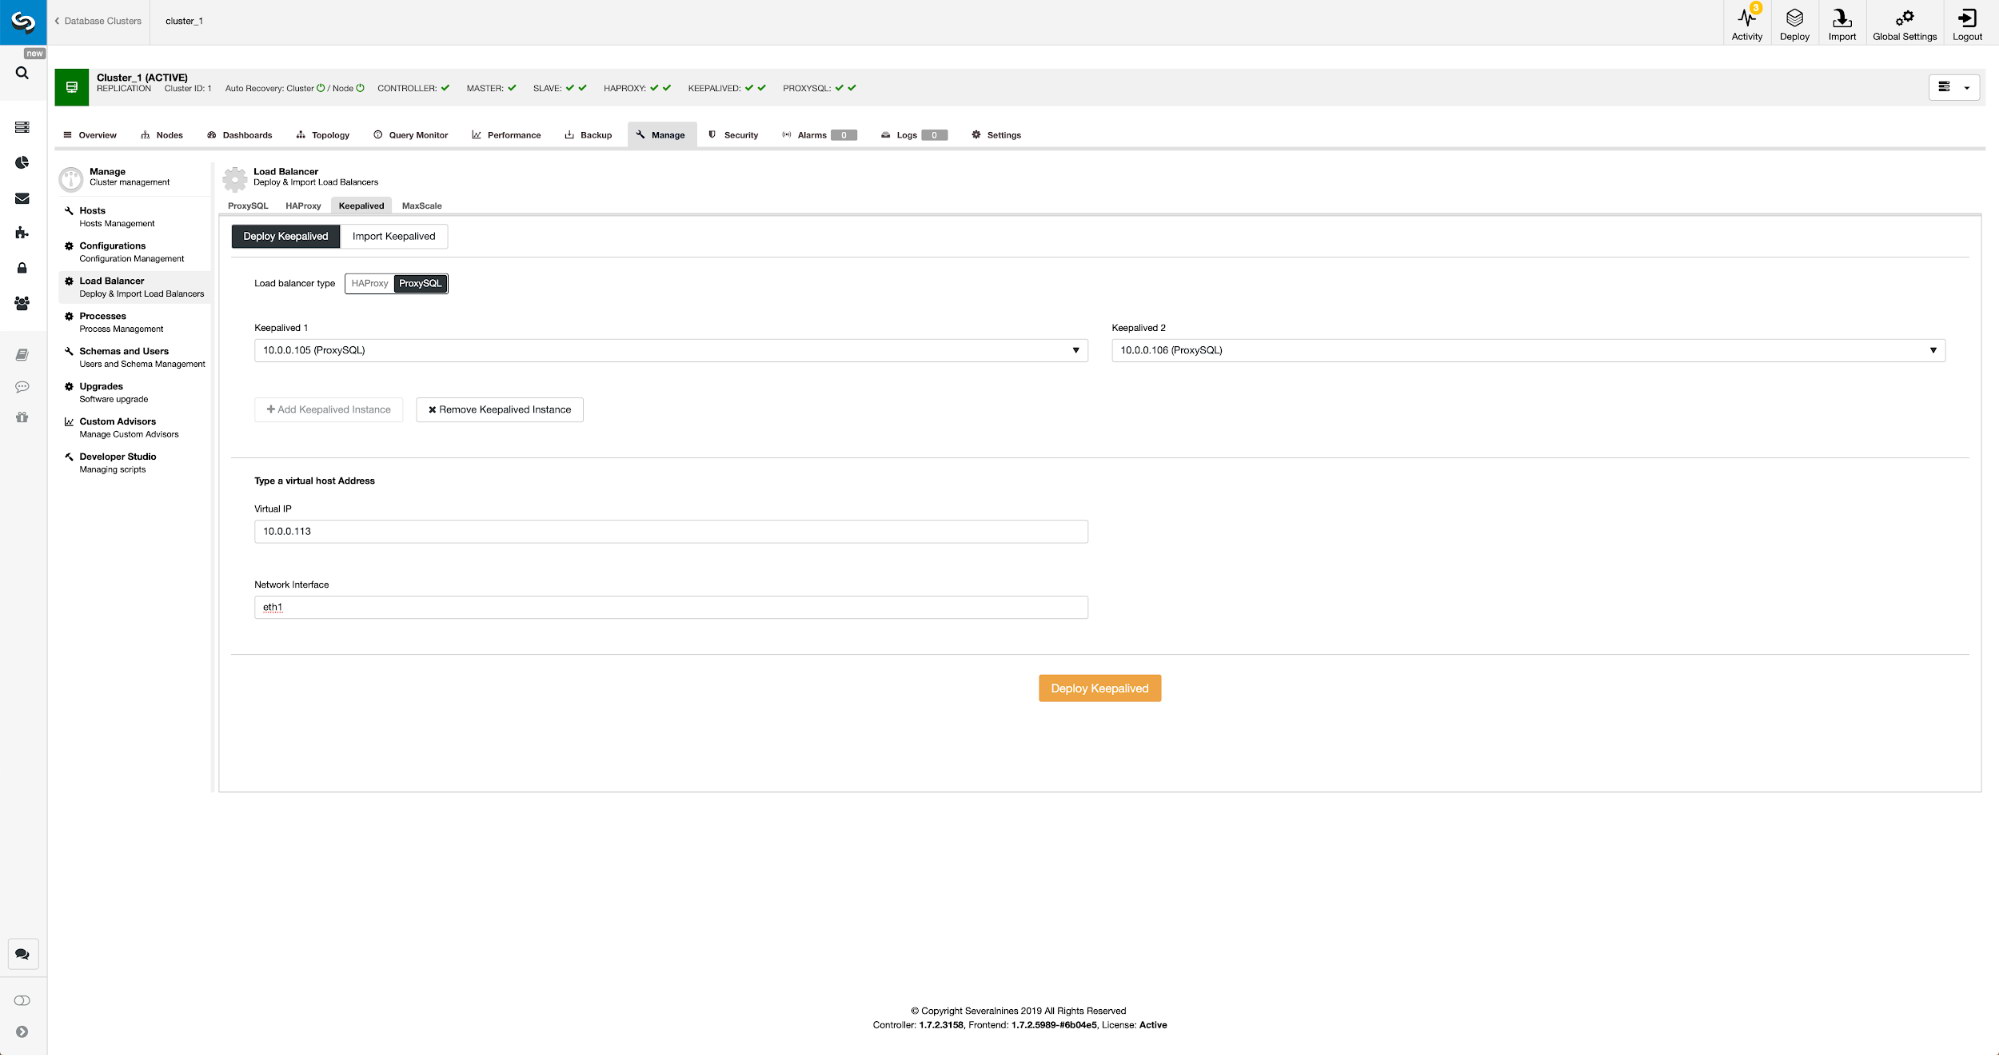
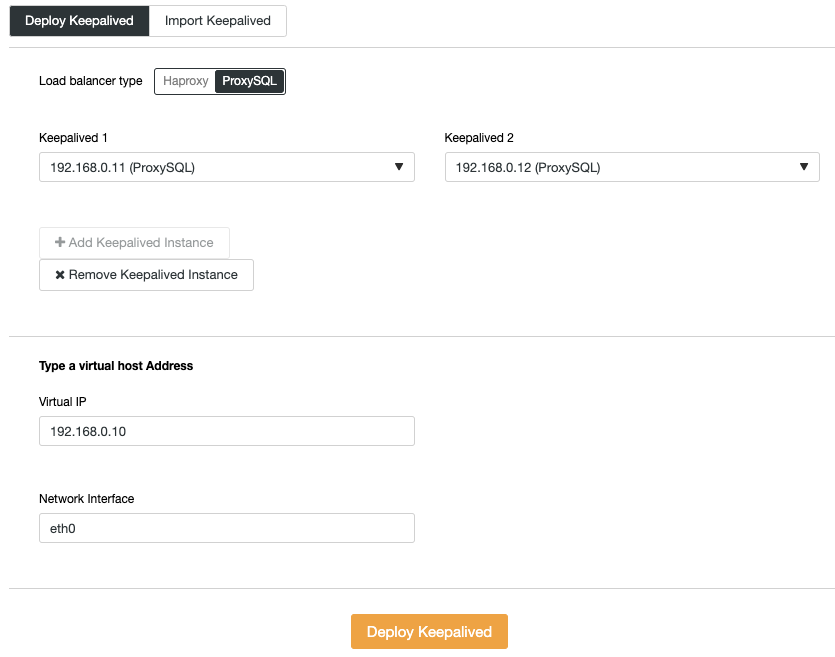
Repeat the ProxySQL deployment step for the second ProxySQL instance, by changing the Server Address value to 192.168.0.12. The virtual IP address provided by Keepalived requires at least two ProxySQL instances deployed and running. Finally, deploy virtual IP address by going to ClusterControl -> Manage -> Load Balancer -> Keepalived and pick both ProxySQL nodes and specify the virtual IP address and network interface for the VIP to listen:
Our database backend is now complete. Next, import the SQL files into the Galera Cluster as the created MySQL user. On the application server, go to the "sql" directory and import them into one of the Galera nodes (we pick 192.168.0.21):
$ cd ~/camunda/sql/create
$ yum install mysql #install mysql client
$ mysql -ucamunda -p -h192.168.0.21 camunda < mysql_engine_7.10.0.sql
$ mysql -ucamunda -p -h192.168.0.21 camunda < mysql_identity_7.10.0.sql
Camunda does not provide MySQL connector for Java since its default database is H2. On the application server, download MySQL Connector/J from MySQL download page and copy the JAR file into Apache Tomcat bin directory:
$ wget https://dev.mysql.com/get/Downloads/Connector-J/mysql-connector-java-8.0.15.tar.gz
$ tar -xzf mysql-connector-java-8.0.15.tar.gz
$ cd mysql-connector-java-8.0.15
$ cp mysql-connector-java-8.0.15.jar ~/camunda/server/apache-tomcat-9.0.12/bin/
Then, set the CLASSPATH environment variable to include the database connector. Open setenv.sh using text editor:
$ vim ~/camunda/server/apache-tomcat-9.0.12/bin/setenv.shAnd add the following line:
export CLASSPATH=$CLASSPATH:$CATALINA_HOME/bin/mysql-connector-java-8.0.15.jarOpen ~/camunda/server/apache-tomcat-9.0.12/conf/server.xml and change the lines related to datastore. Specify the virtual IP address as the MySQL host in the connection string, with ProxySQL port 6033:
<Resource name="jdbc/ProcessEngine"
              ...
              driverClassName="com.mysql.jdbc.Driver"
              defaultTransactionIsolation="READ_COMMITTED"
              url="jdbc:mysql://192.168.0.10:6033/camunda"
              username="camunda"
              password="passw0rd"
              ...
/>
Finally, we can start the Camunda service by executing start-camunda.sh script:
$ cd ~/camunda
$ ./start-camunda.sh
starting camunda BPM platform on Tomcat Application Server
Using CATALINA_BASE: ./server/apache-tomcat-9.0.12
Using CATALINA_HOME: ./server/apache-tomcat-9.0.12
Using CATALINA_TMPDIR: ./server/apache-tomcat-9.0.12/temp
Using JRE_HOME: /
Using CLASSPATH: :./server/apache-tomcat-9.0.12/bin/mysql-connector-java-8.0.15.jar:./server/apache-tomcat-9.0.12/bin/bootstrap.jar:./server/apache-tomcat-9.0.12/bin/tomcat-juli.jar
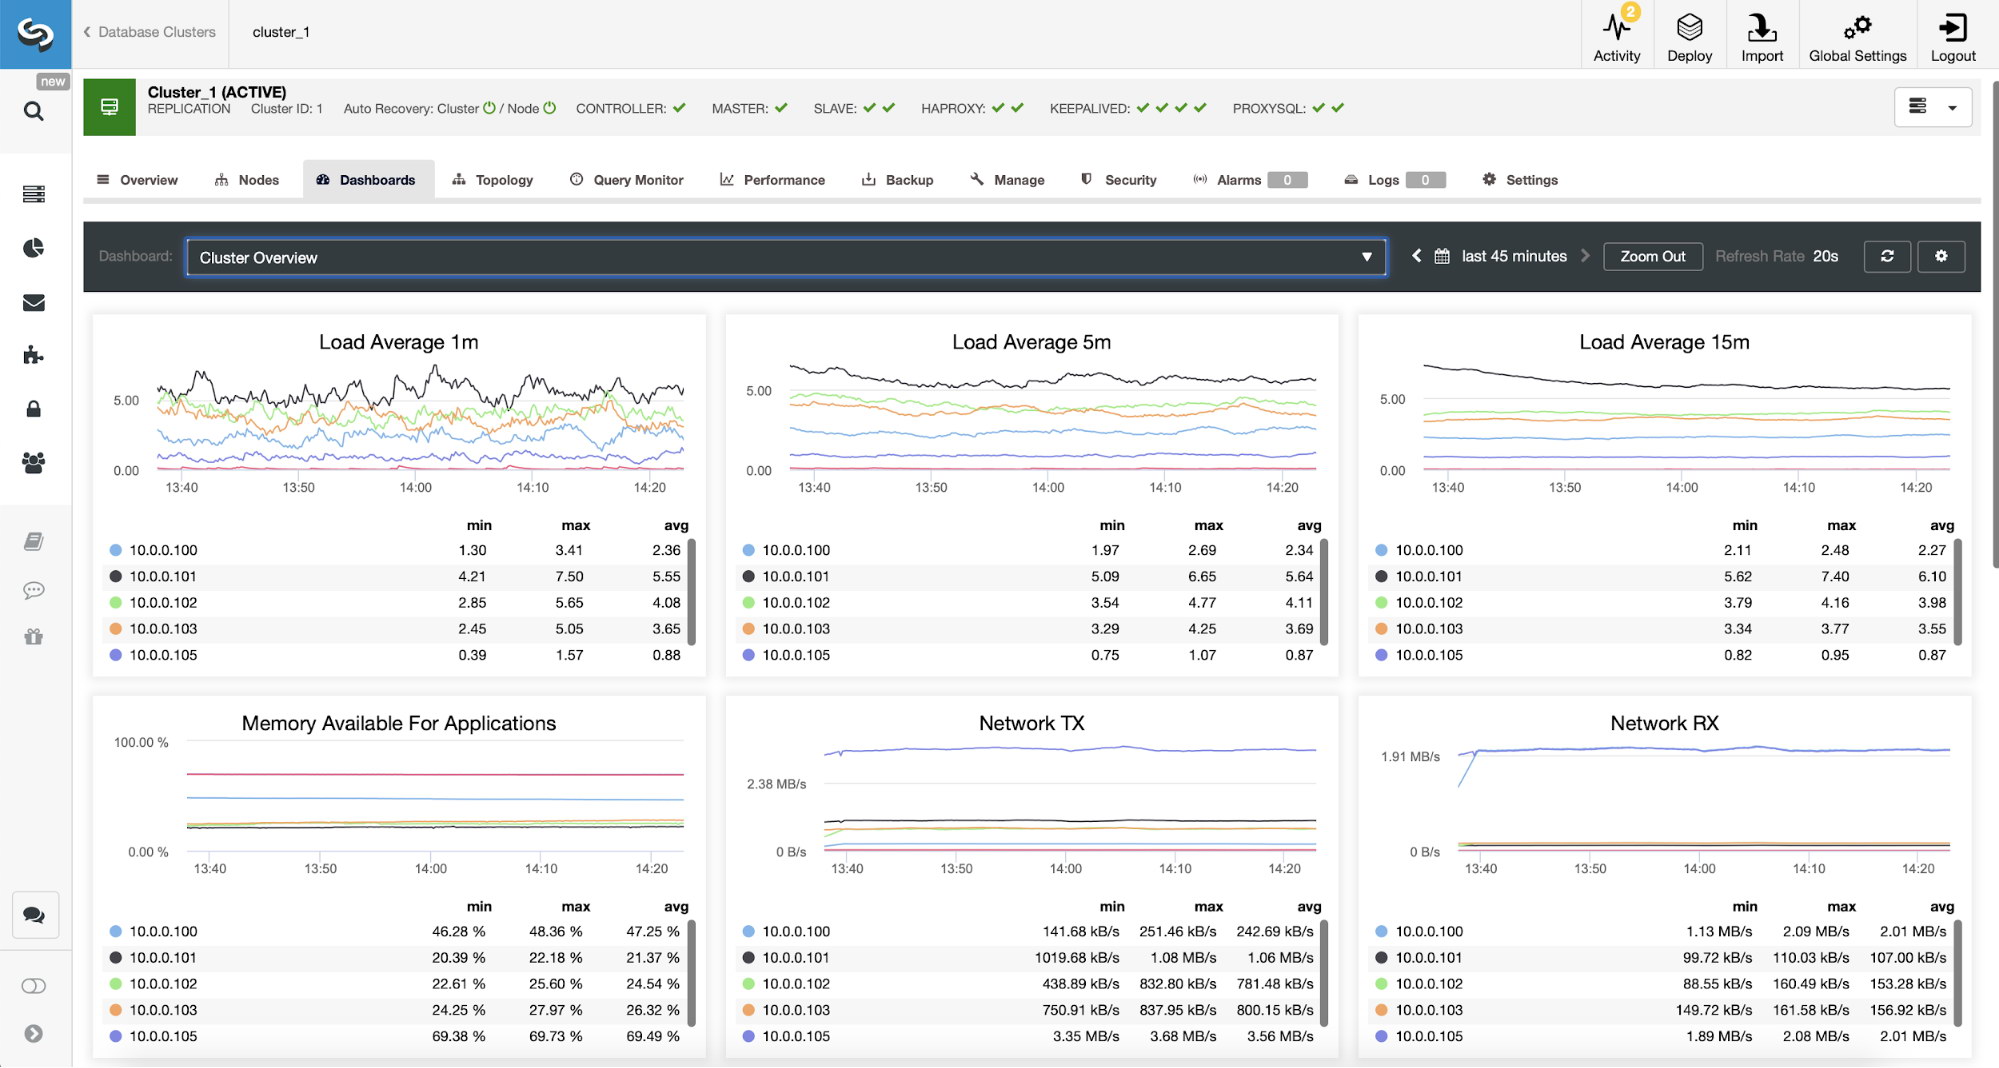
Tomcat started.Make sure the CLASSPATH shown in the output includes the path to the MySQL Connector/J JAR file. After the initialization completes, you can then access Camunda webapps on port 8080 at http://192.168.0.8:8080/camunda/. The default username is demo with password 'demo':
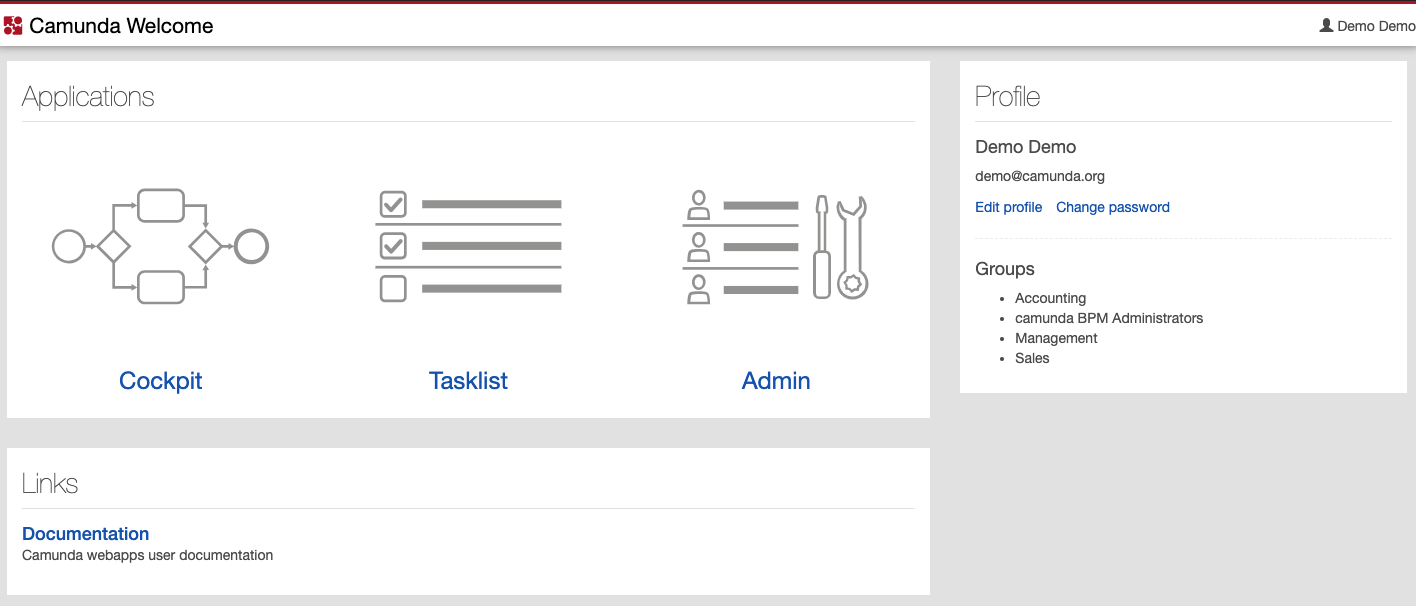
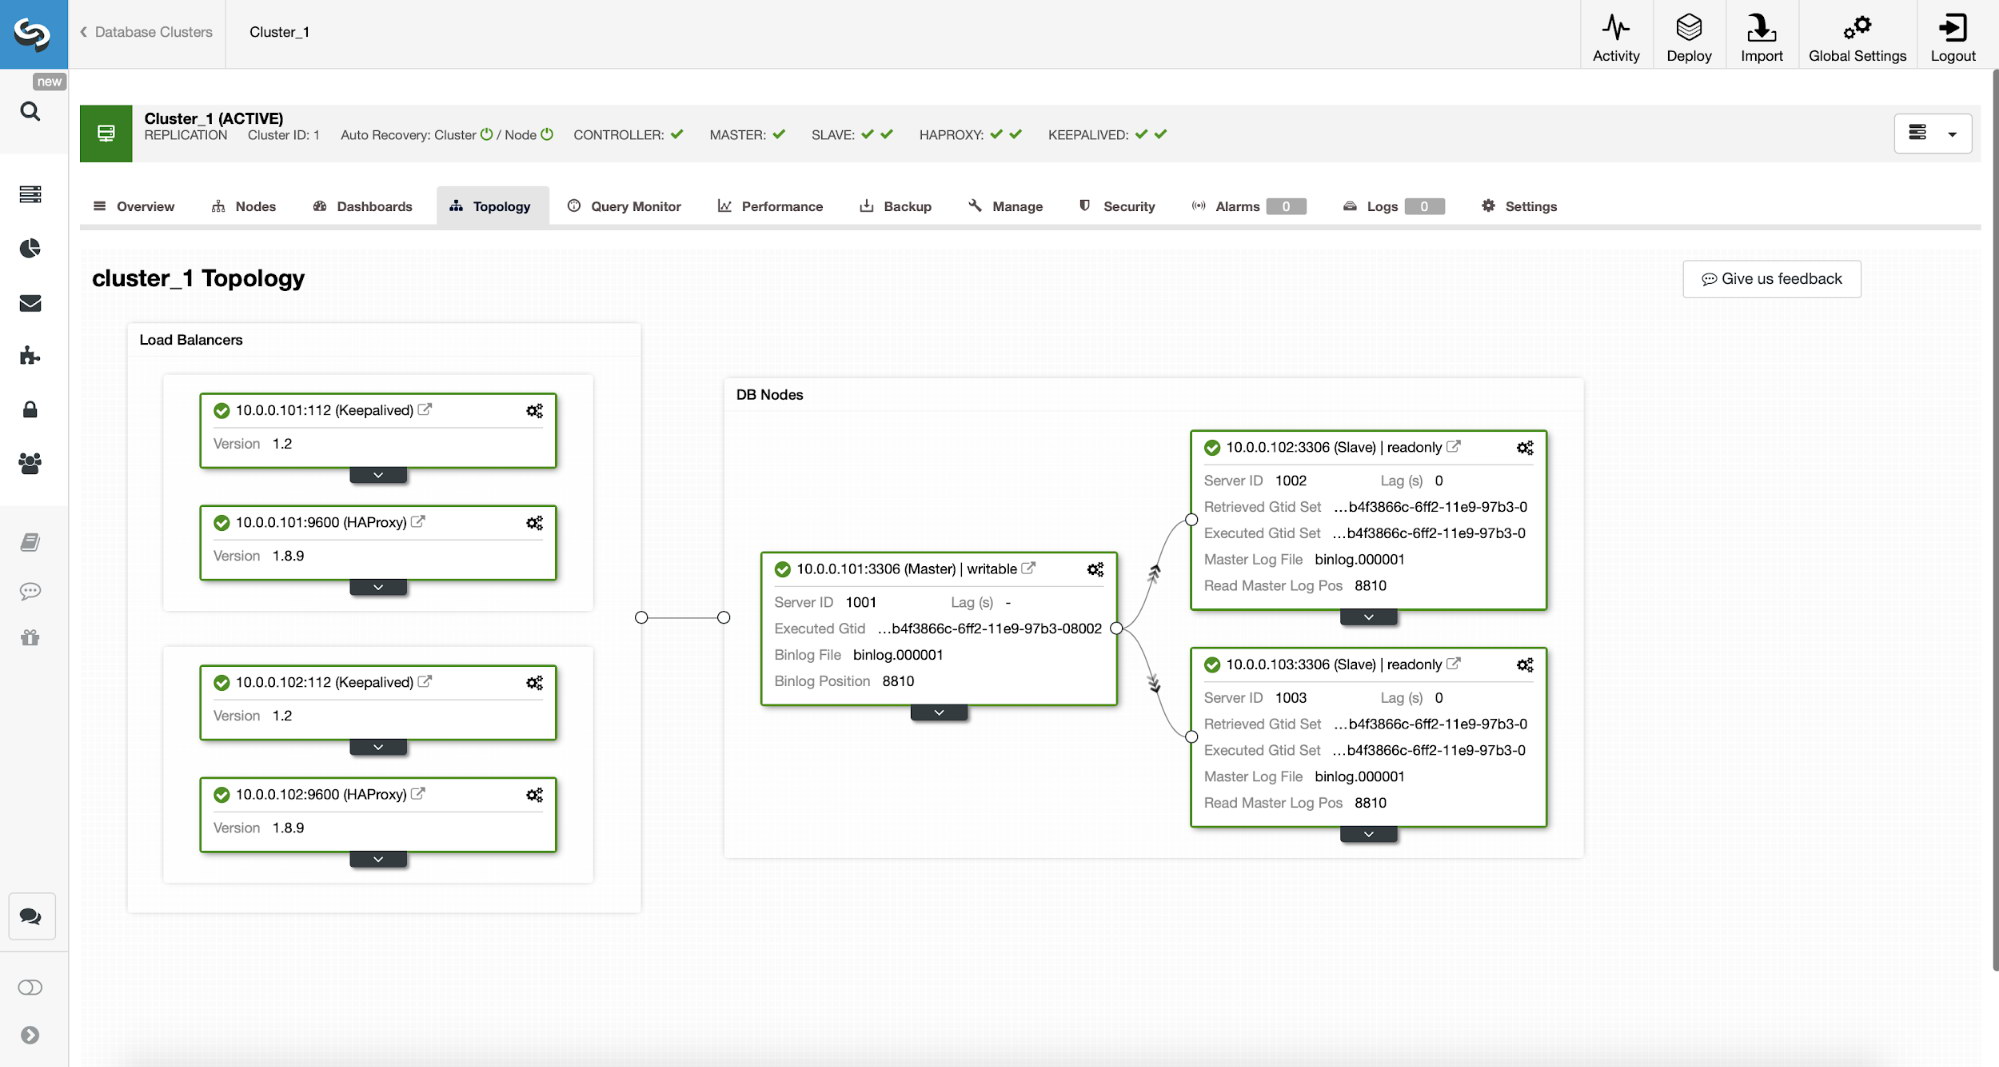
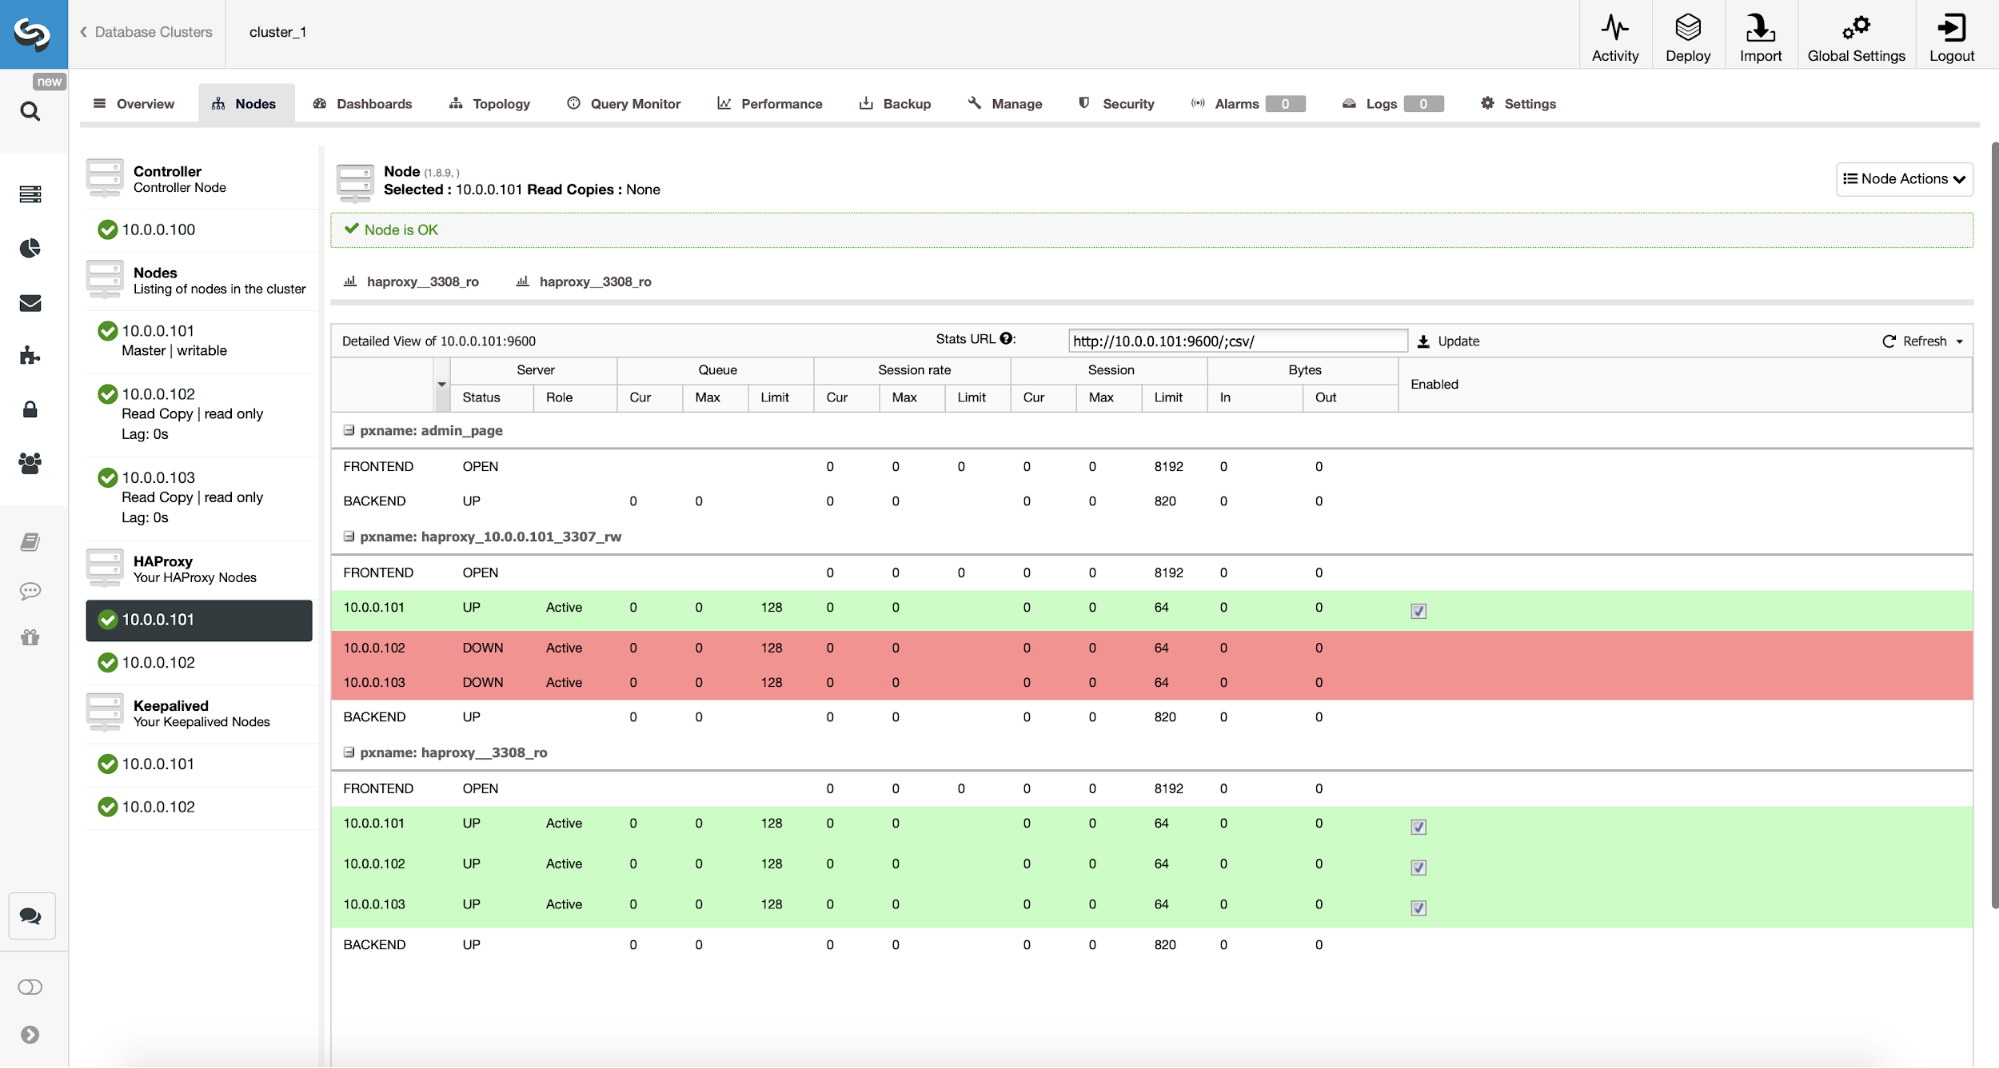
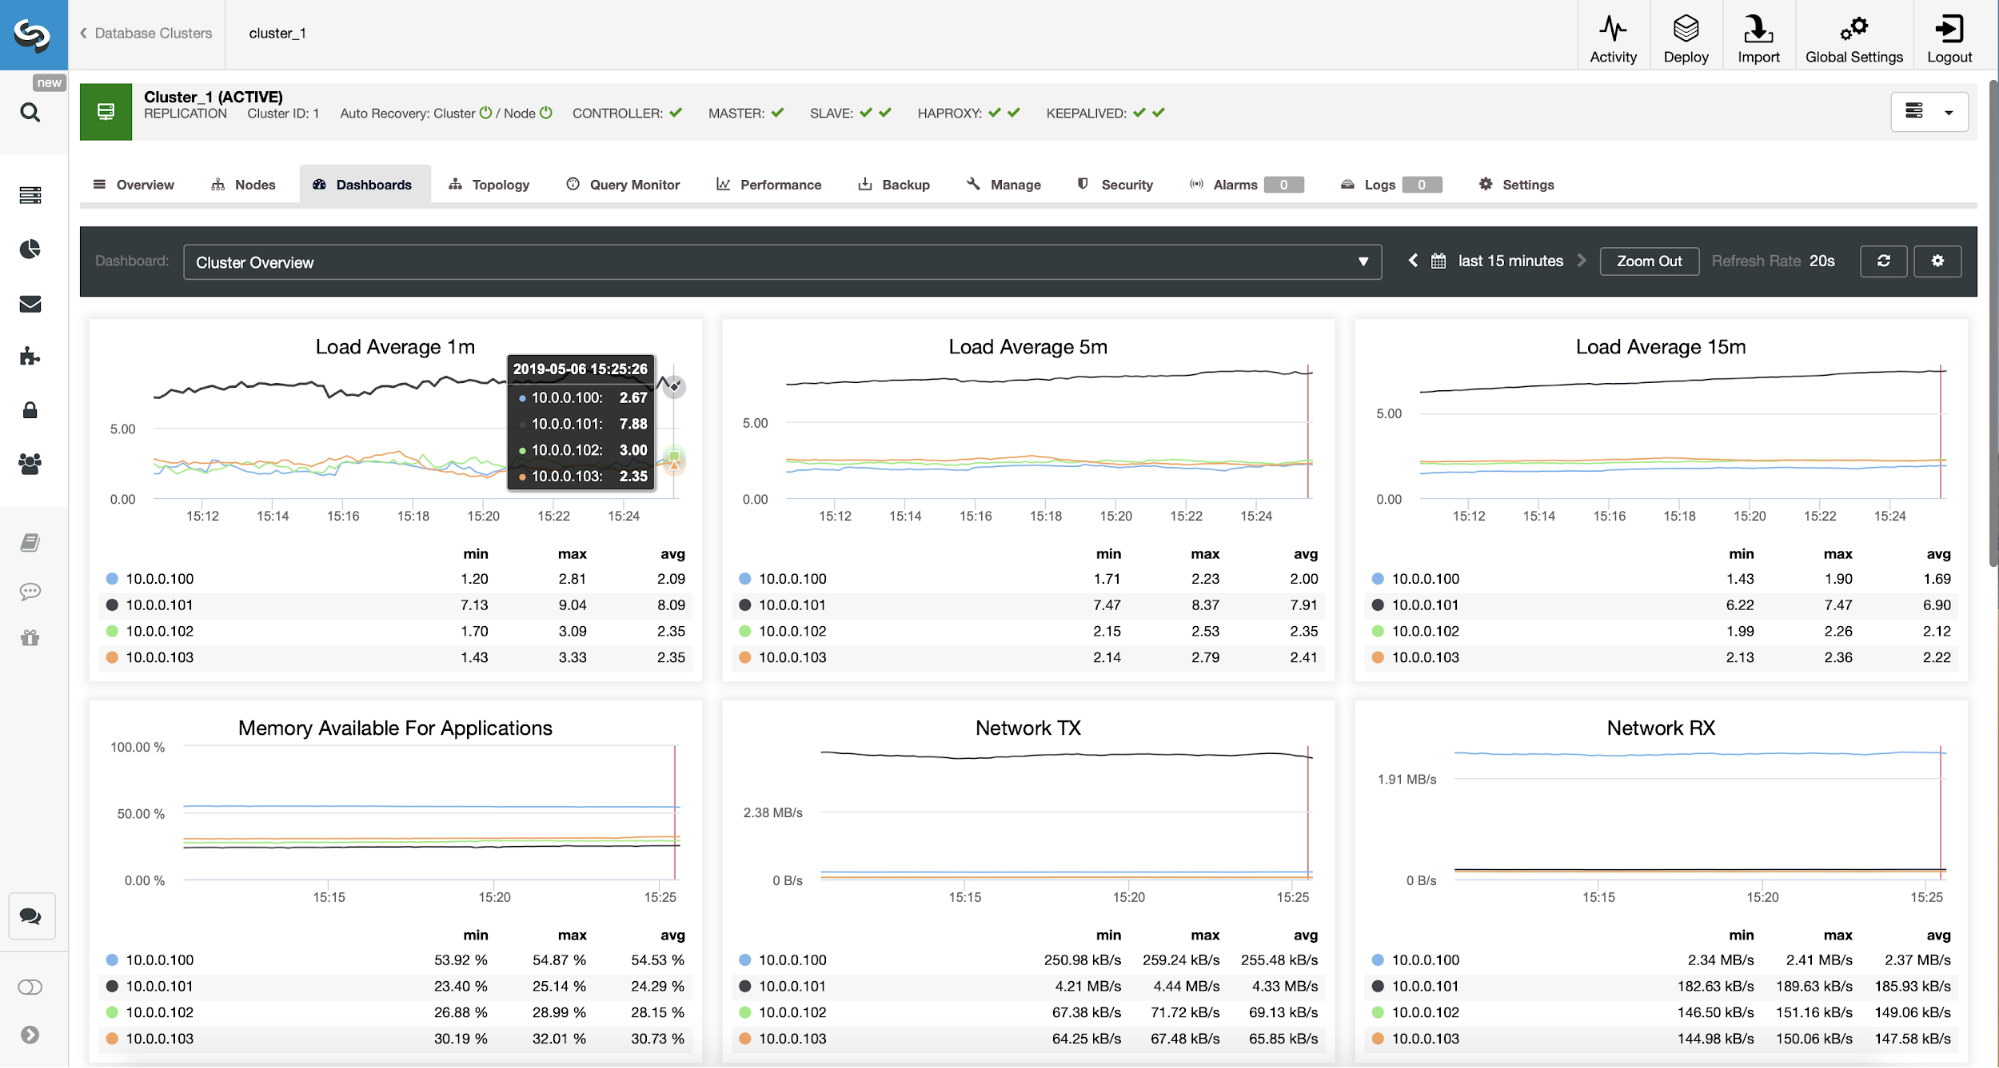
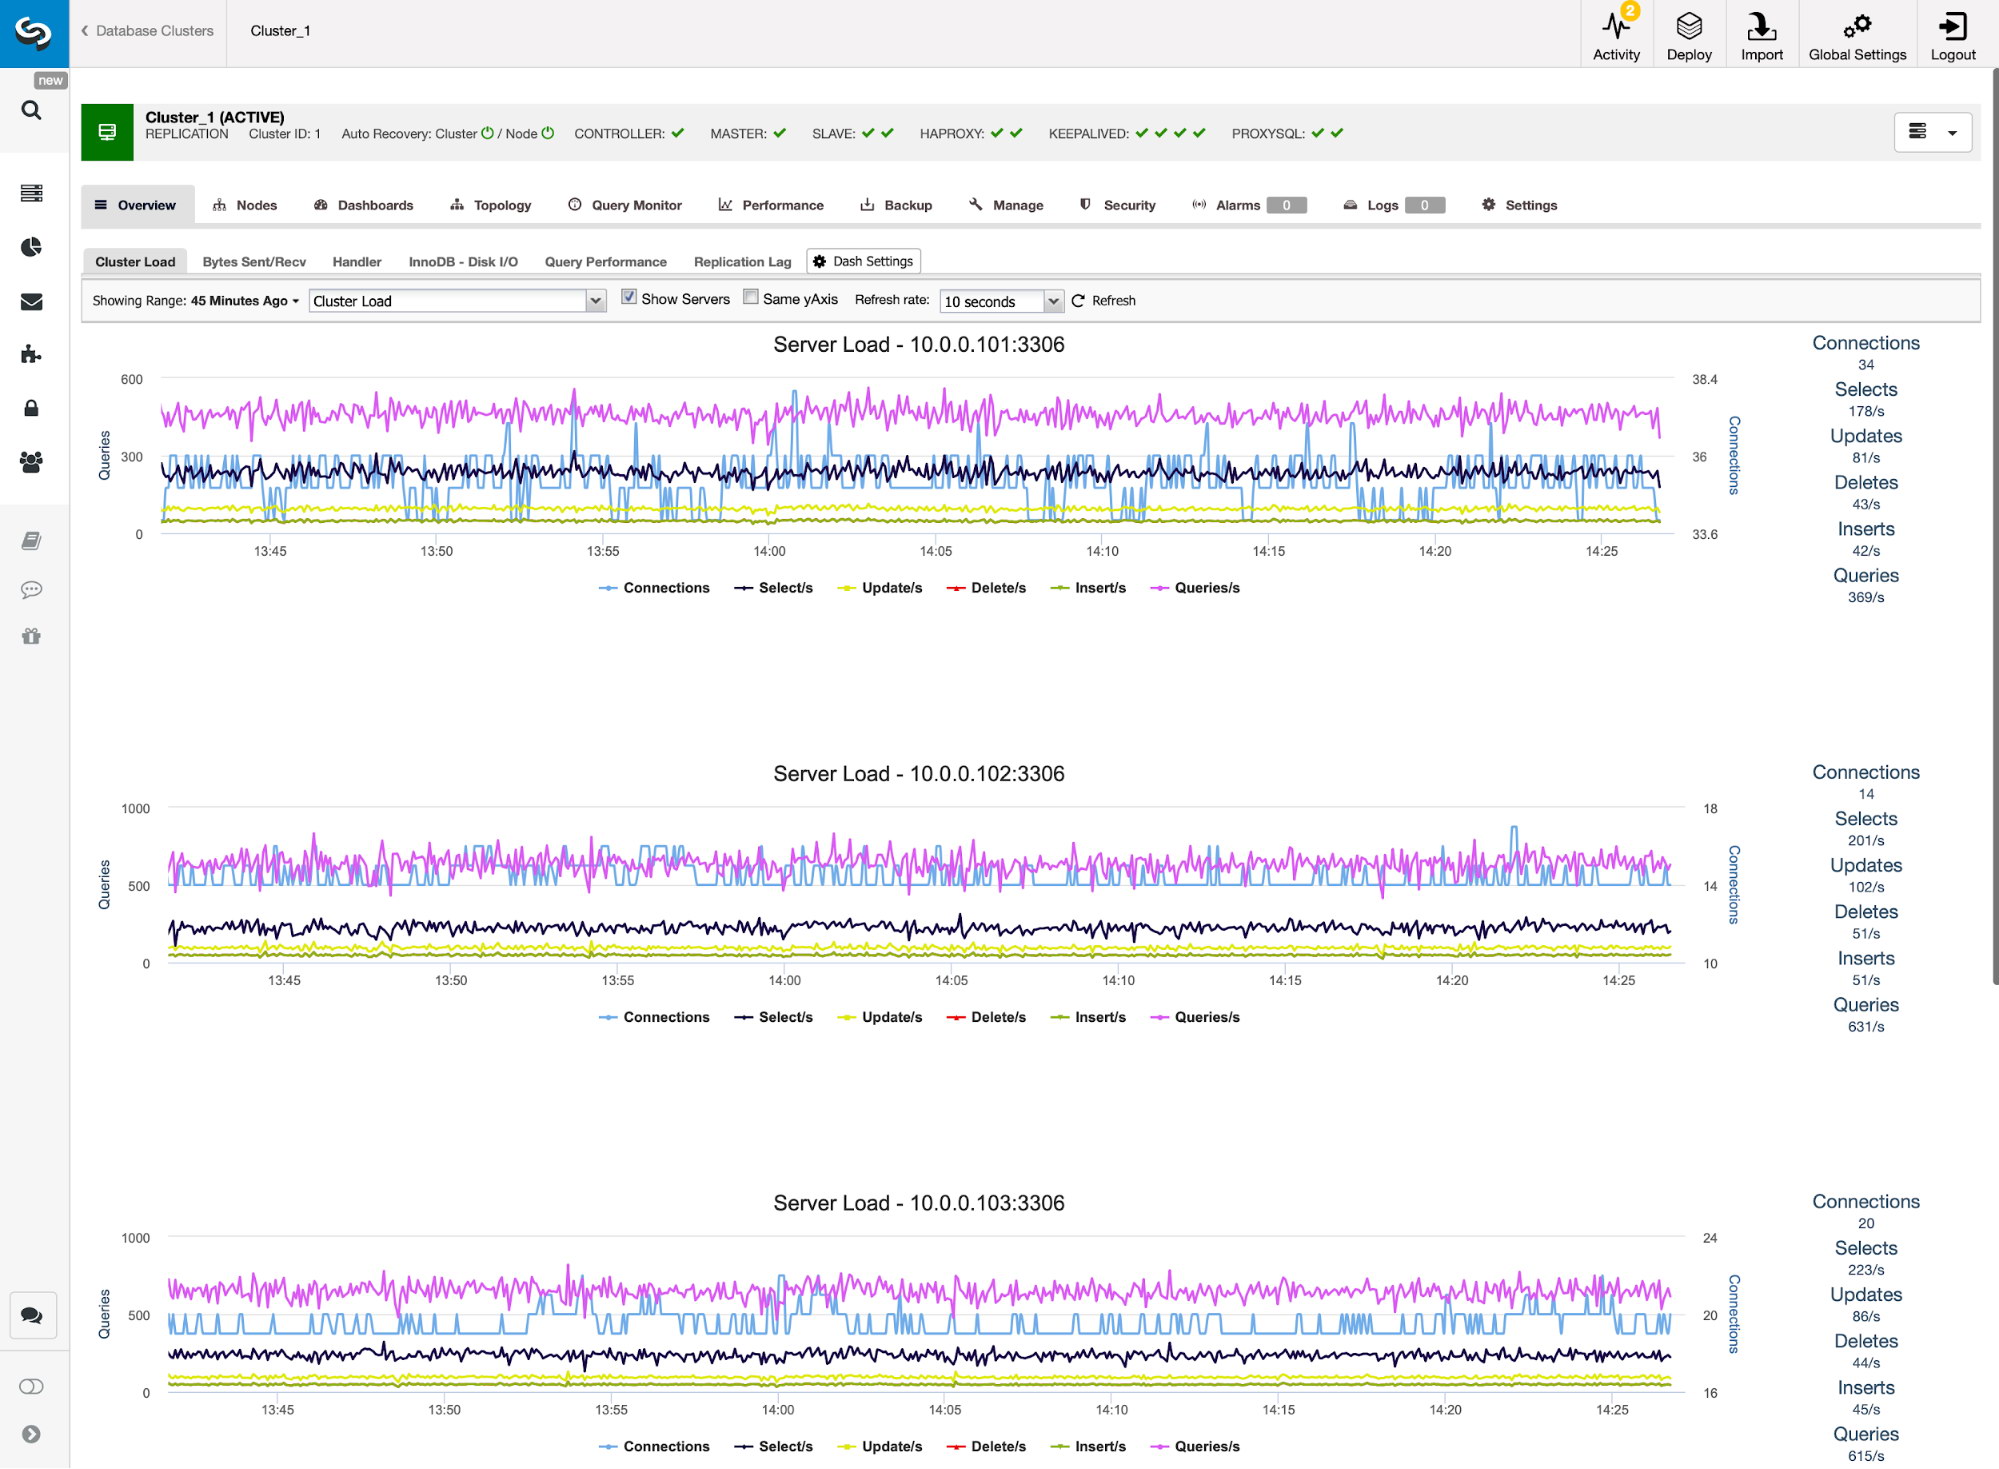
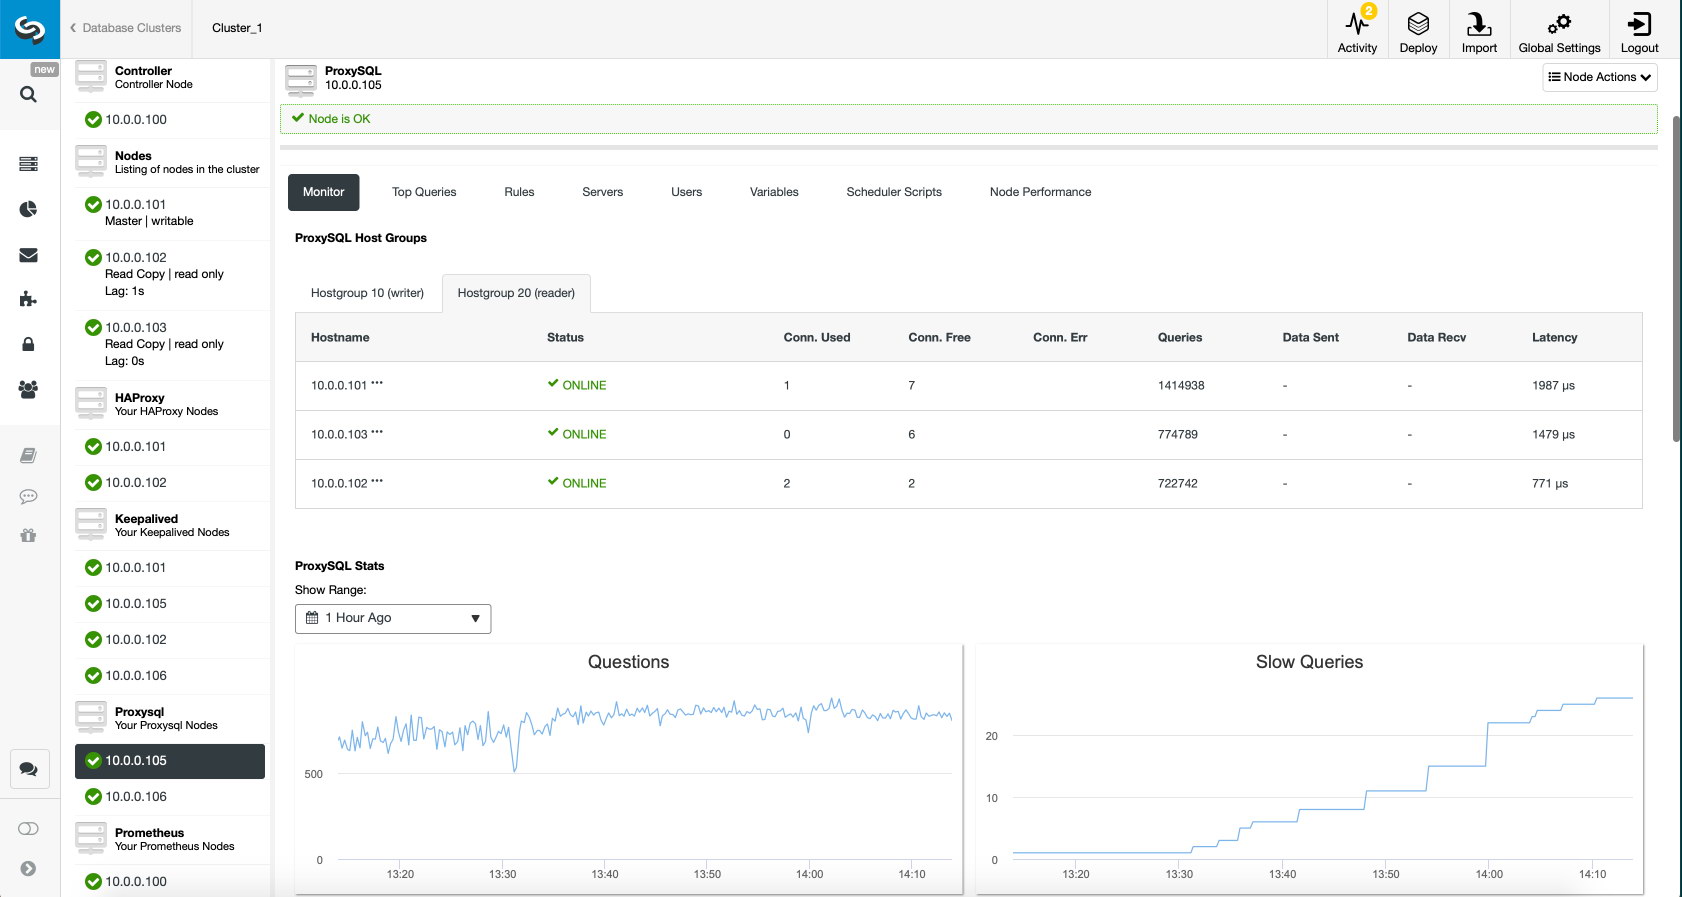
You can then see the digested capture queries from Nodes -> ProxySQL -> Top Queries, indicating the application is interacting correctly with the Galera Cluster:
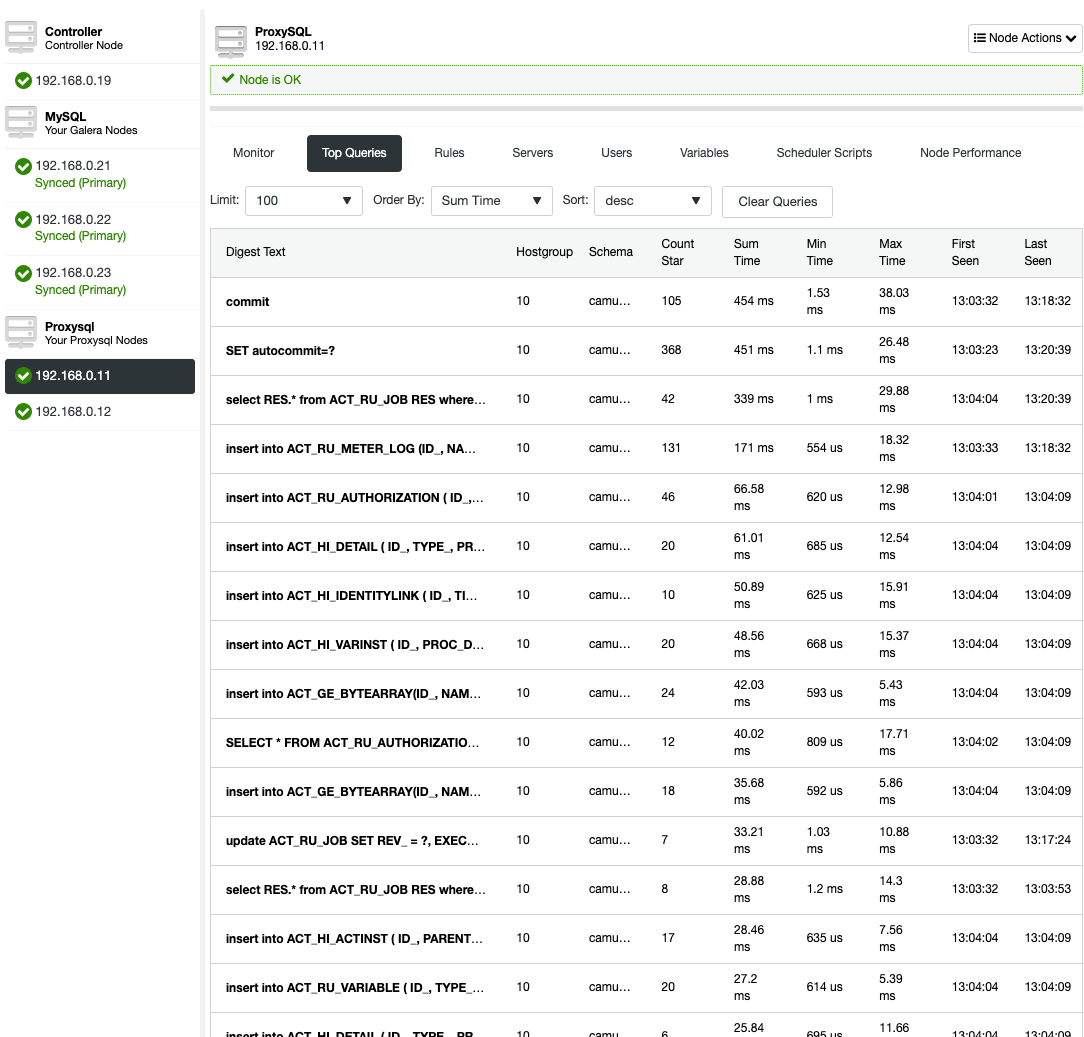
There is no read-write splitting configured for ProxySQL. Camunda uses "SET autocommit=0" on every SQL statement to initialize transaction and the best way for ProxySQL to handle this by sending all the queries to the same backend servers of the target hostgroup. This is the safest method alongside better availability. However, all connections might end up reaching a single server, so there is no load balancing.
MariaDB Galera
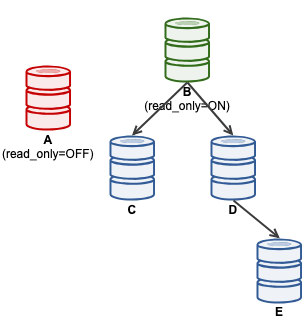
MariaDB Connector/J is able to handle a variety of connection modes - failover, sequential, replication and aurora - but Camunda only supports failover and sequential. Taken from MariaDB Connector/J documentation:
| Mode | Description |
|---|---|
| sequential (available since 1.3.0) | This mode supports connection failover in a multi-master environment, such as MariaDB Galera Cluster. This mode does not support load-balancing reads on slaves. The connector will try to connect to hosts in the order in which they were declared in the connection URL, so the first available host is used for all queries. For example, let's say that the connection URL is the following: |
| failover (available since 1.2.0) | This mode supports connection failover in a multi-master environment, such as MariaDB Galera Cluster. This mode does not support load-balancing reads on slaves. The connector performs load-balancing for all queries by randomly picking a host from the connection URL for each connection, so queries will be load-balanced as a result of the connections getting randomly distributed across all hosts. |
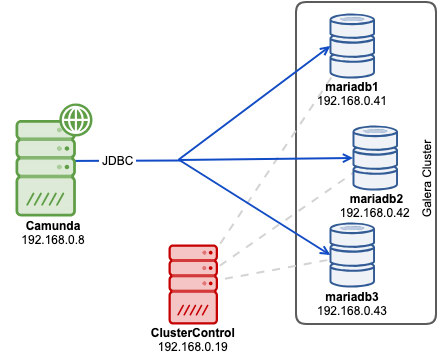
Using "failover" mode poses a higher potential risk of deadlock, since writes will be distributed to all backend servers almost equally. Single-writer approach is a safe way to run, which means using sequential mode should do the job pretty well. You also can skip the load-balancer tier in the architecture. Hence with MariaDB Java connector, we can deploy our architecture as simple as below:
Before we deploy our cluster, modify the MariaDB configuration template file that ClusterControl will use when installing MariaDB servers. The template file name is my.cnf.galera and located under /usr/share/cmon/templates/ on ClusterControl host. Make sure the following lines exist under [mysqld] section:
[mysqld]
...
transaction-isolation=READ-COMMITTED
wsrep_sync_wait=7
performance_schema = ON
...
Save the file and we are good to go. A bit of explanation, the above list are the requirements as stated in Camunda docs, especially on the supported transaction isolation for Galera. Variable wsrep_sync_wait is set to 7 to perform cluster-wide causality checks for READ (including SELECT, SHOW, and BEGIN or START TRANSACTION), UPDATE, DELETE, INSERT, and REPLACE statements, ensuring that the statement is executed on a fully synced node. Keep in mind that value other than 0 can result in increased latency. Enabling Performance Schema is optional for ClusterControl query monitoring feature.
Now we can start the cluster deployment process. Install ClusterControl, generate a SSH key and setup passwordless SSH from ClusterControl host to all Galera nodes. On ClusterControl node, do:
$ whoami
root
$ ssh-keygen -t rsa
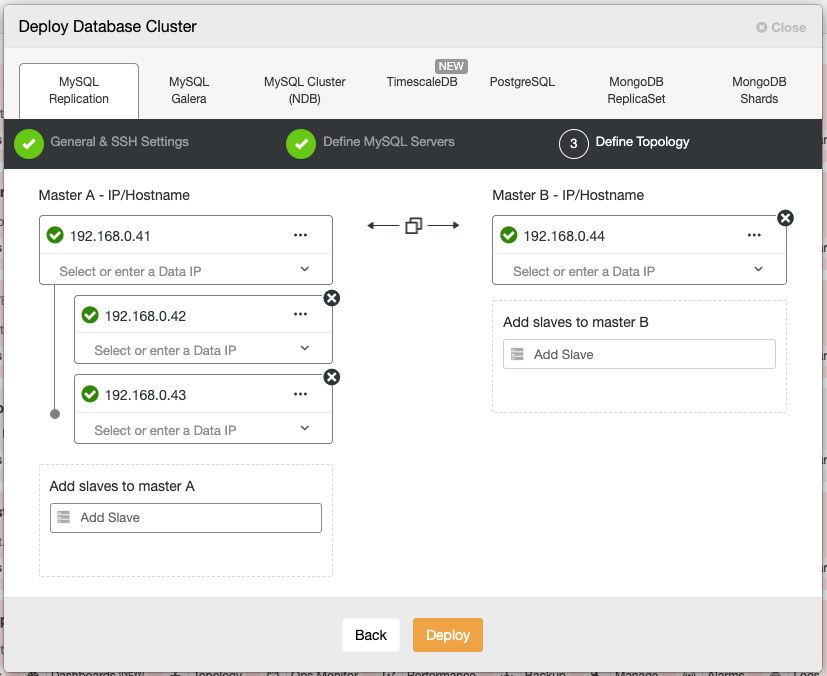
$ for i in 192.168.0.41 192.168.0.42 192.168.0.43; do ssh-copy-id $i; doneGo to ClusterControl -> Deploy -> MySQL Galera and specify the following details (if not mentioned, use the default value):
- SSH User: root
- SSH Key Path: /root/.ssh/id_rsa
- Cluster Name: MariaDB Galera 10.3
- Vendor: MariaDB
- Version: 10.3
- Admin/Root Password: {specify a password}
- Add Node: 192.168.0.41 (press Enter), 192.168.0.42 (press Enter), 192.168.0.43 (press Enter)
Make sure you got all the green ticks when adding nodes, indicating ClusterControl is able to connect to the node passwordlessly. Click "Deploy" to start the deployment.
Create the database, MariaDB user and password on one of the Galera nodes:
mysql> CREATE DATABASE camunda;
mysql> CREATE USER camunda@'%' IDENTIFIED BY 'passw0rd';
mysql> GRANT ALL PRIVILEGES ON camunda.* TO camunda@'%';
For ClusterControl user, you can use ClusterControl -> Manage -> Schema and Users instead:
Our database cluster deployment is now complete. Next, import the SQL files into the MariaDB cluster. On the application server, go to the "sql" directory and import them into one of the MariaDB nodes (we chose 192.168.0.41):
$ cd ~/camunda/sql/create
$ yum install mysql #install mariadb client
$ mysql -ucamunda -p -h192.168.0.41 camunda < mariadb_engine_7.10.0.sql
$ mysql -ucamunda -p -h192.168.0.41 camunda < mariadb_identity_7.10.0.sql
Camunda does not provide MariaDB connector for Java since its default database is H2. On the application server, download MariaDB Connector/J from MariaDB download page and copy the JAR file into Apache Tomcat bin directory:
$ wget https://downloads.mariadb.com/Connectors/java/connector-java-2.4.1/mariadb-java-client-2.4.1.jar
$ cp mariadb-java-client-2.4.1.jar ~/camunda/server/apache-tomcat-9.0.12/bin/
Then, set the CLASSPATH environment variable to include the database connector. Open setenv.sh via text editor:
$ vim ~/camunda/server/apache-tomcat-9.0.12/bin/setenv.shAnd add the following line:
export CLASSPATH=$CLASSPATH:$CATALINA_HOME/bin/mariadb-java-client-2.4.1.jarOpen ~/camunda/server/apache-tomcat-9.0.12/conf/server.xml and change the lines related to datastore. Use the sequential connection protocol and list out all the Galera nodes separated by comma in the connection string:
<Resource name="jdbc/ProcessEngine"
              ...
              driverClassName="org.mariadb.jdbc.Driver"
              defaultTransactionIsolation="READ_COMMITTED"
              url="jdbc:mariadb:sequential://192.168.0.41:3306,192.168.0.42:3306,192.168.0.43:3306/camunda"
              username="camunda"
              password="passw0rd"
              ...
/>
Finally, we can start the Camunda service by executing start-camunda.sh script:
$ cd ~/camunda
$ ./start-camunda.sh
starting camunda BPM platform on Tomcat Application Server
Using CATALINA_BASE:   ./server/apache-tomcat-9.0.12
Using CATALINA_HOME:   ./server/apache-tomcat-9.0.12
Using CATALINA_TMPDIR: ./server/apache-tomcat-9.0.12/temp
Using JRE_HOME:        /
Using CLASSPATH:       :./server/apache-tomcat-9.0.12/bin/mariadb-java-client-2.4.1.jar:./server/apache-tomcat-9.0.12/bin/bootstrap.jar:./server/apache-tomcat-9.0.12/bin/tomcat-juli.jar
Tomcat started.
Make sure the CLASSPATH shown in the output includes the path to the MariaDB Java client JAR file. After the initialization completes, you can then access Camunda webapps on port 8080 at http://192.168.0.8:8080/camunda/. The default username is demo with password 'demo':
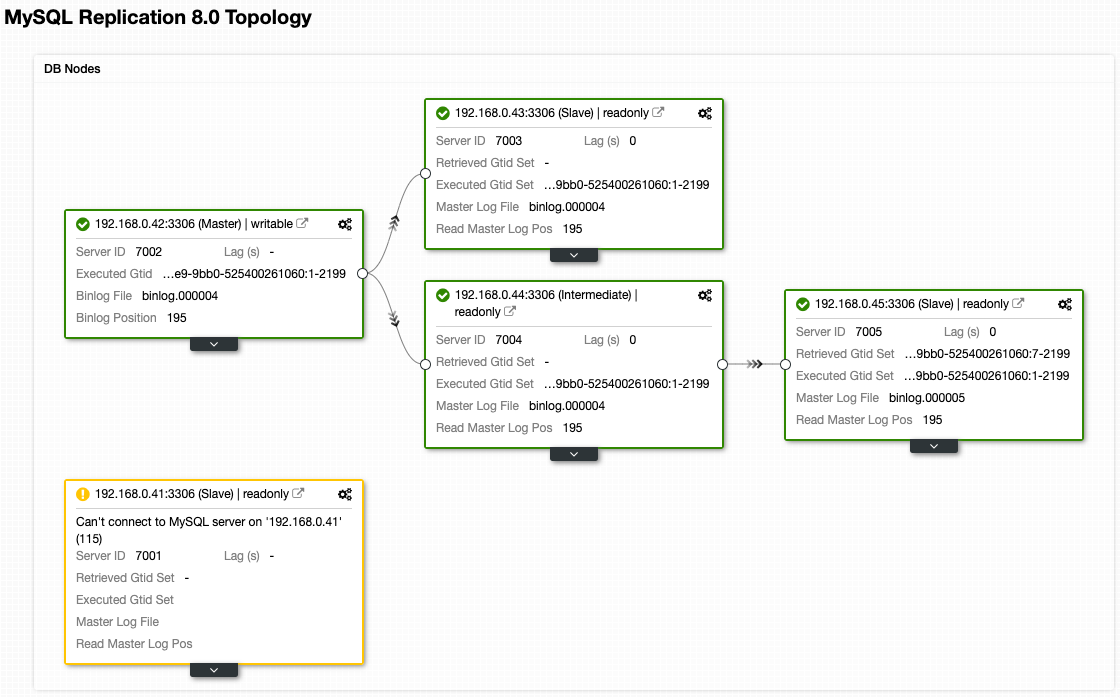
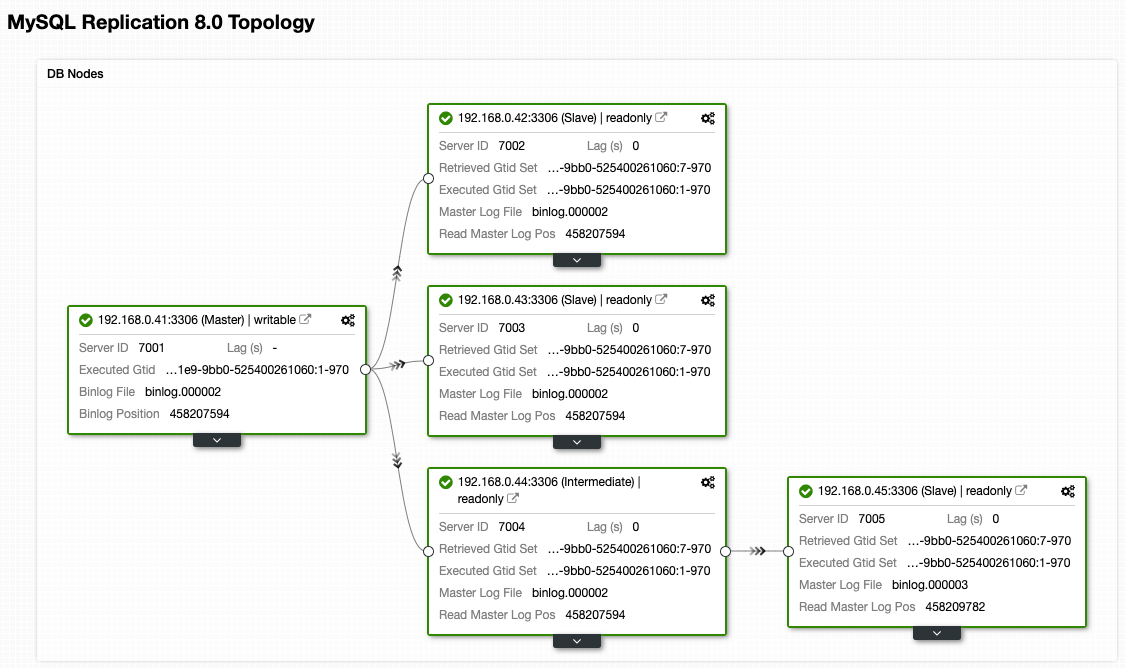
You can see the digested capture queries from ClusterControl -> Query Monitor -> Top Queries, indicating the application is interacting correctly with the MariaDB Cluster:

With MariaDB Connector/J, we do not need load balancer tier which simplifies our overall architecture. The sequential connection mode should do the trick to avoid multi-writer deadlocks - which can happen in Galera. This setup provides high availability with each Camunda instance configured with JDBC to access the cluster of MySQL or MariaDB nodes. Galera takes care of synchronizing the data between the database instances in real time.